About Me

Wednesday, May 30, 2012

Show me what you can do.

Here is one of my favorite new stamp sets.  It's Layered Labels.  When I look at this I can picture it done in beautiful pastels but when I try to do it I come up blank.  So I'm waiting, not so patiently, for someone to blow me away with this stamp set.  In the meantime here's my effort.


I may not be able to do anything tomorrow because today it was so cool that I couldn't pass up the chance to do some weed wacking.  So I wacked for a couple of hours and now I'm really sore.  It really doesn't take me two hours to do my yard but there's a path through the woods between my house and Ted's and it really needed to be cleaned up. 


When I was draggin the electric cord towards the woods I found these little guys sitting on the ground.  Don't know where they came from because I couldn't see any nest in the tree above them.  Mom and Dad have been around all day.  Hope they make it through the night.


And here's a wild flag that I found in the woods.  They are so pretty.  Not so pretty is all the poison ivy that's growing there.  I need to find some weed killer and see what I can do. 

Saturday, May 26, 2012

Don't throw that ribbon away.

I've always saved all the scraps of ribbon and now I know what to do with it.  Here's a couple of cards that I made using that leftover ribbon. 


I used red for the card base and white for the top layer.  Then I cut the heart out of the white layer using the framelits.  I layed the white layer over the red and traced the heart onto the red.  This was so that I could be sure to get all of the heart covered with ribbon.  I wanted to be sure that the ribbon stayed straight (sometimes things tend to wander for me)   so I layed a ruler down on the red layer and traced a line on each side of it for a guide.  Then I just started pulling red, pink and purple ribbon out of my stash.  I used snail to adhere the ribbon down and it seemed to stay okay.  But of course, you could always use glue.  When I had the heart shape completely covered then I adhered the white layer down to the card.  Some of the ribbon that I used is retired because I've been saving it for a long time.  Just add a greeting and you're all done.


And then, because I had so much fun, I had to try a Christmas tree.  And I'm thinking about Easter eggs, pumpkins, Christmas ornaments, stars and flowers.  I might run out of ribbon but I don't think so.  I've got a big container and now people know that they shouldn't throw any of it away.

Thursday, May 24, 2012

Saying Goodbye

The time until the new catalog with be here is getting shorter and shorter.  In just one week and one day we'll be able to order from the new catalog and say goodby to lots of retiring stamps in the old catalog.  For card class today we used 6 retiring stamp sets.  I showed you a couple of them in my last post and here's some more. 


Elizabeth is one of my favorite sets that is retiring.  The oval opening is just the right size for Teeny Tiny Wishes so you can make any kind of card that you want.  Of course there's a little discussion about weather this is upside down.  I guess it's all in the eye of the beholder.


Studio Sketches is another favorite becase it's so versatile.  It can be used for men's or women's card easily.  Like this card.  Is it feminine or masculine?  I think it can be either. 


This set is called Simply Soft and it's a hostess set.  So if you wanted this one you need to have a workshop.  There's still time.


This card doesn't have any stamping on it but the pink paper is called Blushing Bride and it's retiring.  The details don't show up real well but we used a different embossing folder on each layer of the cake. 


The stamp set on this photo album is retiring.  It's a hostess set called Faith in Nature.  But this card also gives you a sneak peek at a couple of items from the new catalog.  The darker green card stock is a new in color called Gumball Green.  And the shapes on the left hand side are all new dies and sizzlets.  I've had so much fun playing with my new stuff.  And next Thurs you can come and play.  I'm having a sneak peek day.  Come anytime and make a couple of cards using all new stuff.  And you'll be able to order out of the new catalog because on Friday moring I'll be sending in an order.  So be looking through the new catalog and make your wish list.  If you don't have a new catalog just let me know and I'll get one to you. 

Monday, May 21, 2012

Something new.

No, I'm not going to show you anything new out of the new catalog.  This is just a new idea for a new year.  This year the theme for Stampin Up is "My Way"  It's all about doing business my way so I'm going to try some new things.  And the first one starts this week at card class.  We're going to do a Christmas card at every card class.  And here's the one we'll be doing this week.


I'll be so sad to see this stamp set, A Christmas Carol, retire.  I used it a lot last year but it's going so if you want this one you'll have to order it right away.


And yes, we're going to use the doily die again.  I think that the more I use it the better it works.  You still need to poke most of the pieces out but at least they all cut real good.  And I was thrilled when I saw two new doily dies in the new catalog. 
Happy stamping and I'll post some more cards tomorrow.  Maybe.

Friday, May 18, 2012

Business card holder

Yesterday I showed you pictures of the business cards that we made at my downline meeting.  And then I posted a few of them on Stampin Connection.  That's a demo only website where we can share ideas and photos.  Well, I got kind of worried because someone asked me where I sent them to get them approved.  So this morning I called demo support and as long as I didn't use the Stampin Up! logo I'm okay.  I was so relieved.  I don't want to get in trouble with Stampin Up!
Anyhow, here's the little box to put the cards in.  It's made the same way as the big card box that I showed you last Friday.  This is exactly why you need the Simply Scoring tool and the diagonal plate.  Here's some more pictures.

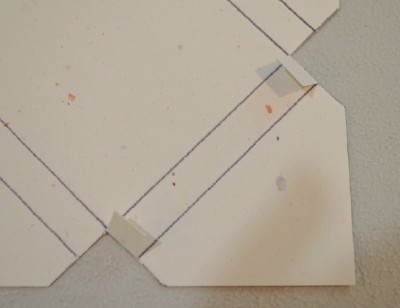
When your using the diagonal plate you can put these little markers in to show you where to score.  The dark ones I colored with a sharpie.  So the dark ones are for two opposite sides.  Score at 1 5/8" and 2 1/8".  Then score the other sides at 2 5/8" and 31/8".  I drew on the score lines below so you can see what it should look like.


Now you're going to cut off the two triangles on each side.  I only did two sides in this picture so you can see what I'm talking about.


There are little tabs left where you cut off the triangles.  Cut these so that they fold towards the small flap.


Cut off the point on one of the large flaps and adhere sticky strip to what will be the inside of the box.  And now you'll have to go back to last Friday to see how the box looked when it's put together because I forgot to take a picture of it today. Don't you just love forgetful people? 


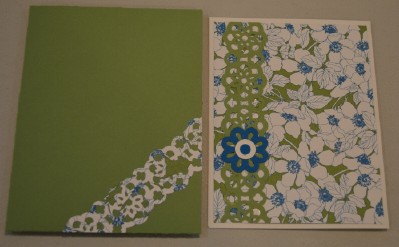
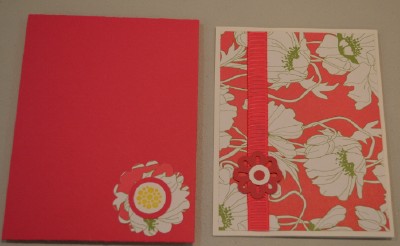
And here's one of my finished boxes.  I did another one where I just put one of my cards on the outside.


The Simply Scoring tool is a wonderful addition to your stamping supplies.  You can make a box any size that you want.  I just started with the size for an envelope that is ???   Hmm.  I was going to tell you but I can't remember where I got the size from.  I think it's with the instructions that come with the diagonal plate but since I can't find them right now I'm not sure.  I've always said that if I were organized I'd be dangerous but there's not much chance of that.  Anyway, somewhere I found the instructions for an envelope that is a little bigger than 2 x 31/2".  Then I decided that I wanted my box to be about 1/2" thick so I just added 1/2" to the dimensions and then added a second score line on each side that was 1/2" beyond the first score line.  So if you've figured this out so far you should be able to make boxes of any size.  Maybe I can get someone to take a video and I can post it online.  It's really not to hard to figure out.  If you have trouble with it come and see me.  I'll be glad to help you.

Thursday, May 17, 2012

Making business cards

In our Stampin Success magazine last month there was an article about making your own business cards.  I decided that would be a good theme for a downline meeting so this morning we made business cards and a holder to put them in.  Here's a few examples.


It was so much fun to see what everyone came up with.  Now I want to see what you can come up with.  I also made a box to put them in and tomorrow I'll show you the box.

Saturday, May 12, 2012

Using retired stuff up.


First things first.  This is the closure side of the card box that I showed you yesterday.  I just used a brad to attach the scallop and the flap slides behind the scallop.  Another idea is to just put a dot of Tombo glue on the flap and let it dry.  It's sticky then and will hold the flap down but let you lift it up time after time.


And then I made four note cards to put in the box.  I wanted to use up some of the Designer Series Paper that is retiring.  And with the Simply Scoring Tool and the diagonal plate is so easy to make envelops that I made one for each card.  And then I added a little decor to the envelope.  Now I can always have a fancy envelope to match my cards. 


Friday, May 11, 2012

I'm always watching for boxes to put cards in because they make such great gifts.  So here's one that I found online.  I don't remember where I found it so I can't give credit but I love the box.


Here's a picture of my finished one.   And here's the instructions.  Hope they make sense to you.


I didn't put pictures of each step but hopefully you'll be able to figure it out.  Start with a piece of 11 x11 card stock.  The heavier the better.  My white one already has some rips in it.  Or maybe I should say "just be careful" when your scoring.  Now score it at 3 1/2 and 5 1/2 on two opposite sides.  Then on the other two sides score at 4 1/2 and 6 1/2.  I have the scoring tool and it's so easy to do this with the diagonal plate.   After you score it then cut the little triangles out.  There are two on each side.


Now you're going to cut one side of each piece that has a triangle.  Can you tell by the picture that I cut the smaller sides so that the flap folds toward the small side. 


Now you're going to add some sticky strip on one of the large flaps.  You want the sticky strip on the inside of the flap.  You'll notice that I cut the point off of this side.  It just makes the box look nicer.  Now just fold it together, small flatps in first, and stick it down.  I had a hard time getting it square but just be careful.


And here's a close up of the verse that is on my white box.  I got this off of Sandi Dailey's blog and I really like it.  I think it's perfect for a gift of handmade cards.

Monday, May 7, 2012

Windy City weekend

Laurel and I went to Chicago for the weekend to see her grandson, Triston, and his show choir from Greenville perform at the Field Museum.  It was not the best weekend for sightseeing.  The weather was cold, windy and foggy.  Here's a view from our hotel.  We were on the 20th floor and we could watch the clouds drift by.

On Sat morning we went to Shedd Acquarium and this was the view of the shoreline from in front of the acquarium.


Then we went to the Navy Pier and this was taken of the light house.


I wanted to take a ride on one of the tall ships but I think the weather was to cold and I wouldn't have had a good view of the skyline.  But I did see these pirates waiting to entertain people on the ship.


Zach and Nathan at the Hershey store.


Triston looks pretty hot here.  And I mean that the room was very warm.  It was a really good time for all of us up until Sun morn.  David and Amy and the boys stayed on the South side of Chicago and they checked out of their hoted, drove up to the Field Museum and when David went to park the car the front right tire developed a broken ball joint.  Ended up calling Jeff and Gina to come to Chicago and haul the car home.  But we were very thankful it didn't happen when they were driving somewhere.  Overall it was a pretty good weekend but I want to go back sometime when it's warmer and not so foggy. 

Thursday, May 3, 2012

Recruit Special

Stampin Up! has done it again.  There's a new recruit special and it's perfect for everyone.  Mostly because you can customize everything the way that you want it.  There's no required items except the business supplies.  Here's the deal.  The price is $99.00 and it's valued at $190.00.  You get the business supplies and then you pick $125.00 worth of anything that you want.  So you could get all stamp sets, paper, punches, ink pads, anything you want.  This is a wonderful deal for anyone who has been stamping for awhile because you probably already have the basic supplies so now you can go wild choosing anything else.  And the best part is that you can pick some things from the new catalog by using the sneak peek.  Just let me know if you're interested.  I've got some of the new sneak peek items ordered and I can hardly wait to see them.  I've also read that some of the demo's have gotten the new ink pads and they're absolutely wild about them.  One lady in California said that she's so taken with them that she's going to order all new ones.  I'll let you know next week when I get my order.

Wednesday, May 2, 2012

Dinoroar

We have a demo meeting next Tues and I was trying to come up with a swap card today.  These cards didn't make the cut but I kind of got hung up on Dionroar.  This first one is my attempt to make a little girls cards with dino's.  What do you think?


This last one would be good for someone who's in the Red Hat Society.  The colors just seemed to call to me. I used the pinking heart border punch and the pinking heart corner punch.  Both of these punches are retiring.  Now I've still got to come up with a swap card for Tues.