About Me

Friday, August 30, 2013

Envelope board is coming.

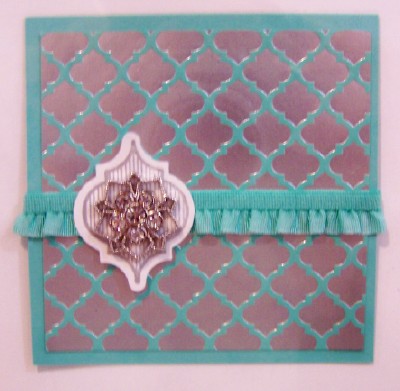
I know that these pictures aren't the best.  I should have used a black background but I didn't so here they are.  I actually designed these myself.  My main idea was to show you what you can do with the new Envelope Board that will be available on Sept 1st.  The card is Pool Party with Winter Frost dsp layered on it.  The poinsettia is stamped with versamark and embossed with silver on card stock velum.  I stamped the poinsettia twice and cut out the whole poinsettia and the center of the other one and stacked them with deimensionals.  Then there's a greeting on top of the new silver ribbon that is available in the Holiday catalog.  I made the envelope out of Pool Party card stock on the envelope board.  Then I added the silver embossed poinsettia on the corner. 
 
 
And now that we have the framelits to make envelope liners I had to do that too.  Of course the framelits make liners that fit the regular Stampin' Up! envelopes but I think that it worked pretty good on this envelope also.  And you can't see it in this picture but I cut out the envelope with the new wavy cutting blade.  If I hadn't used the wavy blade I would have trimmed the flap to match the liner. 


Thursday, August 29, 2013

Beautiful Christmas decor

Here is one of the things that we made at Creative Convention.  This beautiful frame with Christmas decor in it.  Here's the full frame and then there's some close ups of the elements.  These frames are 12 x 12 and the elements are 3 x 3.  This picture uses the Winter Frost designer series paper and if you look close you'll see the Frosted Finishes Embellishments.  These are not brads.  They are flat on the back and you can attach them with glue dots or dimensionals. 


Look at that beautiful paper.  It's shiny.


I love this and I'm planning on making some for Christmas presents and I  really want to do a Halloween one.  I just need to find the time.

Tuesday, August 27, 2013

Wedding tablescape

Ronda always has "show and tell" at all of her events and Creative Convention was no exception.  And this is the prize winner.  It's a wedding table centerpiece.  This first picture shows all three pieces together and the last three pictures are close up's of the rosettes.  I didn't get the name of the person who did this but I think it's a great idea.  And you could do it for any event.  Think how cool this would be for a Thanksgiving table done in fall colors and leaves.


Monday, August 26, 2013

Shoe box swap.

 
This is the card that I designed for the shoe box swap at Creative Convention.  I used Crushed Curry, Cajun Craze and Chocolate Chip card stock.  The designer paper is the new Sweater Weather paper out of the Holiday catalog.  The maple leaf was stamped with the new Magnificent Maple stamp which is also in the Holiday catalog.  It was stamped with Versamark and embossed with gold powder.  The greeting is out of a set called Yippee Skippee that is in the big catalog. The shoe box swap is a great way to get lots of new samples so I've got lots to show you.  We'll see if I keep up with the posting.  And now that I've posted today I'm going to check out some other blogs. 

Sunday, August 25, 2013

Home again, home again, jiggity jig.

I'm home from Ronda's Creative Convention.  The last two days were filled with ideas, hints and tips and lots of make and takes.  This is the display table that Sandy Haynes and I put together to showcase the new card maker framlits.  We had both won one at the convention in Salt Lake so Ronda asked us to do a display.  It was very well accepted but I was really nervous because I coundn't come up with a really wow 3-d project.  The card maker framelits just didn't lead me in that direction.  But I guess people liked it okay.  After convention was over I sold all of my cards but three.  I also made the banner on the front of the table.  It's the banner kit that is in the Holiday catalog.  I'll have to put it up for awhile so you can see it if you come to a class. 
 

Well, Ronda gave us a "suggestion" that we should always update our blog before we go to look at anyone else's blog so now I'm going blog surfing.  I'll try to get more pictures posted later.  I've got a ton of swap cards and make and takes to show you.

Monday, August 12, 2013

Tag a bag and a big mistake.

Here's a picture of the Tag a Bag bags.  Is that proper grammer?  Anyway when you buy the bags they are flat like the one on the left.  But at convention they showed us how to make them stand up.  There's probably a word to describe them but I'm drawing a blank.  They stand up like the grocery bags do.  So you can take any flat bag and change it.  I'll post the directions when I find them. 
 
 
And here's my big mistake.  Never lay your framelits down where you might lay your magnetic platform on top of them.  I think that's what happened.  I lost the framelit and decided to just keep going because I knew it would show up sooner or later.  So I ran the new piece of card stock through with the card maker framelit.  But when I went to do the next one it wouldn't go.  Wouldn't budge an inch.  Panic time.  I have card class next week and Creative Convention.  I have to have my Big Shot in working order.  So I looked it all over and there was something stuck in the rollers.  Well this is what it was.  It must have been stuck on the bottom of the magnetic platform.  I pulled it out and then tried cutting some card stock with it and the framelit appears to be usable but not flat anymore. 
 
 
So just a word of caution.  Always put your framelits down some place away from the magnetic platform.


Friday, August 9, 2013

Thinking about Christmas gifts?

Do you like to be ahead of the game and have all your Christmas shopping done early?  Or are you like me and love the last minute rush of shopping?  I don't usually wait until the last minute to do my shopping but I love to go shopping and enjoy the hustle and bustle.  But if you like to be ready early here's something for you.  In the big book on page 158 you'll see the Tag a Bag Gift Bags and Tag a Bag Gift Boxes.  If you read the description of the boxes it say they come with an acetate sleeve.  They're food safe boxes and you get 8 for $6.95.  I wasn't real interested in them until I saw them in real life.  We got one in our make and takes at convention and let me tell you, the acetate sleeve is very heavy duty and the boxes are wonderful.  They are made so perfectly straight that it's amazing.  Here's a picture of the one that I got at convention.  We put a piece of card stock over the open top of the box and then slid the sleeve on.  And of course it needed a tag.  I love these boxes.  If you want to see it just come to one of my classes.
 
 
Here are the separate pieces.  I can't emphasize enough how nice the acetate sleeve is. It just doesn't show up in the picture good.

 
Tomorrow I'll show you the Tag a Bag Gift Bags.

Wednesday, August 7, 2013

Winter Frost

Here are the make and takes that we did last night at our regular meeting.  They are all Christmas cards and they all feature the Winter Frost designer series paper.  This paper is so beautiful that you should all have it.  Just think of all the Christmas and winter cards that you could make.


They're all so pretty.  I've got a few more samples that I'll post as I get to them but I've found so many samples that I think you could make at least 20 different cards with this paper. I'll try and post a couple of them each week.
 

Tuesday, August 6, 2013

Christmas in July

I know, it's already August but my Christmas Stamp A Stack was last week and it was still July.  But as of August 1st you can now order out of the Holiday catalog.  And these cards all feature something out of the Holiday catty.
 
 
The greeting on the card above is from Delightful Dozen stamp set which is in the big catalog but the designer paper is in the Holiday catty.  It's the Winter Frost paper stack. 

 
This stamp set is Calm Christmas from the Holiday catty.  The middle layer is brushed gold and the bird is embossed in gold.  It's much prettier in real life.

 
This set is Joyful Christmas and it's embossed in gold on Cherry Cobbler card stock.  Then I cut the poinsettia out and mounted it on Shimmery White card stock.  The greeting is embossed in gold.

 
This little guy is punch art but the striped paper is Season of Style out of the Holiday catty.

 
The ornament was stamped with Ornament Keepsakes which was in last years Holiday catty but was carried over to this year.  However the snowflake, Festive Flurry, is in the new Holiday catty. 
Hope you enjoyed these cards and are thinking about getting started on your Christmas cards.