About Me

Saturday, June 30, 2012

Card for a Handy Man


Here’s a card from this week’s card class.  It’s a punch card featuring wrenches.  You could use this for any occasion in a handy man’s life.  The head of the wrench is a 1 ¼” circle punch with the word window punch used to punch the opening.  A little hint is to cut the word window punch first and then cut the circle.  The handle of the punch is just a ½” strip and the bottom of the wrench is a ¾” circle with a flower punched out of the center.  The flower punch is from the Itty Bitty Shapes punch pack.  The greeting is from the Itty Banners stamp set.  There are framelits that can be used to cut out the banners but I don’t have them yet so we had to resort to scissors.  The background used is the  Woodgrain stamp.  I did a little sponging to give it a more used look.  Punch cards are so much fun and this one is so easy to do.  I copies this from someone else but I don’t remember who it was so I can’t give them the credit that they deserve.

Monday, June 25, 2012

To busy to stamp.

It seems like I've just been to busy to get anything done.  Which is part of my problem.  I start a project and then I think of something else that I should be doing so I switch to the new project and then something else occurs to me.  And then at the end of the day nothing is completely done.  But now that graduation open houses are done maybe things will settle down just a little.  So while I haven't been doing a lot of stamping, well, except for convention swaps, I do have some cards to show you.  Last Sat Ronda had a baggie book/ new catalog kickoff and here's a couple of swap cards from that event.

Terri McNamara made this first card.  A wonderfull summer time card.  Makes me want to get out there and go for a bike ride.  Now if I just had a bike.


This card is from Bonnie Keiser.  I love the colors in this one.  Another happy, feel good card.

Monday, June 18, 2012

More new stuff

I have a terrible habit of trying out something and then laying it aside to finish later.  Well, yesterday I had to try this new embossing folder.  It's called Argyle.  Well, I tried it on a piece of Very Vanilla and I thought "that's nice.  But what would it look like if I sponged it"  So I sponged it with Soft Suede and I really liked how it showed up.  So then comes the point where I would lay it aside to finish later.  But I decided that I need to quit doing that.  So I finished the card with a new stamp set called "Horse Frontier".  I think it turned out pretty good.  A nice masculine card.  What do you think?

Saturday, June 16, 2012

More new gadgets (aka accessories)

So here's a couple of cards that are showing two new accessories.  This first card is showing an embossing folder along the right hand side of the card.  This folder is a narrow one and it comes in a package with another folder (that I showed you yesterday).  The duo is called Delicate Designs.  It doesn't say it's snowflakes but that's what I see when I look at it.   The snowflake stamp is from "Jolly Bingo Bits" and the mittens and greeting are from "Chock Full of Cheer".


And this next card show a new edgelit that comes in a package with the edgelit that I showed you yesterday.  The duo is called Finishing Touches.  It's a little hard to see but it has a small saw tooth design.  Here I used it on both sides of the Bashful Blue card stock.  Then I put a piece of the 1/8" ribbon down the center.  The greeting on this card is from a set called "Itty Bitty Banners"  and the rest of the images are from "Baby Boutique".

Friday, June 15, 2012

new gadgets.

I had such big plans for this week and here it is on Friday and my list is still way to long.  So I'm off for a day of shopping.  Does anyone know how to get rid of chipmunks?  At this stage I'd just as soon they were all dead.  I've tried all kinds of deterrent but they're making a horrible mess of my hosta beds.  Maybe they just like hosta's.  So today I'll check at Mennards and Home Depot to see what they suggest.  I'll try anything.
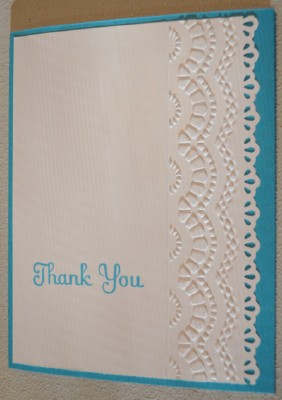
So here's a quick card to show you.  I know it's not the best picture but it shows two things that I wanted to show you.  The Finishing Touches edgelit was used to get the scalloped border and the Delicate Designs was used to get the embossed scallops.  If you decide to do something like this make sure that you do the edgelist first because if you do the embossing first then it gets flattened when you do the edgelit.  Does that make sense?  Emboss first and then cut. 


And when you look closely at this picture you'll see that I put it together backwards.  The embossed image is debossed.  I should have turned it over to get the embossed image.  It doesn't really matter and I love these new gadgets.  And by the way, they both come in a package with another item.  Two embossing folders and two edgelits.  I'll try and show you the others tomorrow.  Notice I said try.  But if it's going to be as hot as they're predicting I'll probably be inside all day so I should get it done.

Tuesday, June 12, 2012

I've been busy.

Trading Days was this past weekend in Ashley and I won this chair on the fire department's silent auction.  It was built by someone at the prison.  Did a lot of sanding and it's now painted and ready to go out on the front deck.  Just need a little table to sit beside it where I can put my drink.


This is probably why I don't always get much done.  Ronda is always telling us to put things away when we're done with them and it's a great idea but I don't seem to do it.  There is a little spot right in the middle where I can work.


However I did get some stamping done.  This is an idea that I found in a crafting magazine.  I love the idea of black on black.  The magazine also had the card in white but I didn't like it as well.  This is going to be my swap card for the next Rubber Queens meeting.  There are two new stamp sets used on this card.  The "Love" in the middle is from a set called "You Are Loved"  It's a beautiful Valentine set.  The flouishes behind the love are from a set called "Flowering Flourishes"  And the background is embossed with the Tulip folder.  It doesn't show in this picture but there are three different layers.  And you can probably tell that the "Love" and the layer beneath it are both heat embossed with black embossing powder.


Today I downloaded the Holiday Mini and I can hardly wait for you to see it.  It's 40 pages long and I want everything in it.  There's new glitter paper, a metallic pen, lots of new designer series paper and tons of new framelits and punches.  Fantastic!!!!

Tuesday, June 5, 2012

More Christmas???

Here's another cute and quick card using the new designer paper "Be of Good Cheer".  I love, love, love this paper.  The greeting on here is from the new stamp set "Chock Full of Cheer" and the little images around the edge are out of "Jolly Bingo Bits".  The green card stock is the new in color Gumball Green and the red is Cherry Cobbler.